
Resin and Hardener Guide: How Epoxy Resin Works and How to Use It
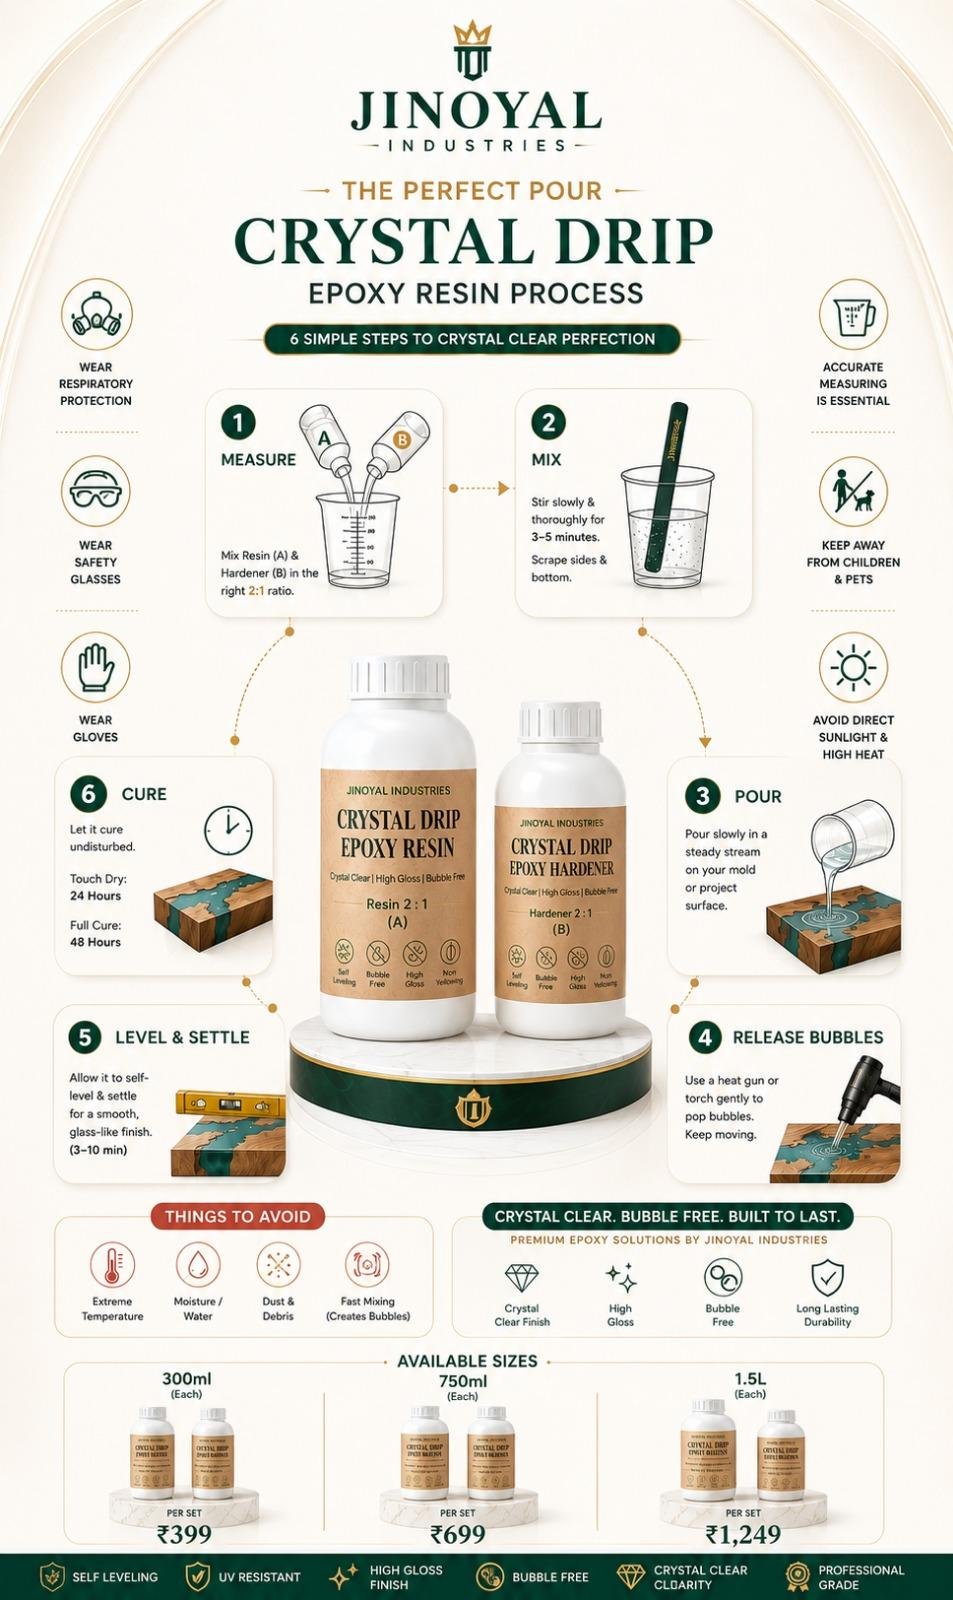
Resin and Hardener: A Complete Guide to Mixing, Uses, and Creative Applications
Epoxy resin has become a popular material for artists, DIY creators, craft enthusiasts, and handmade businesses. From glossy resin coasters and decorative trays to jewelry, keychains, clocks, and artistic artwork, epoxy resin can be used to create a wide variety of products.
However, epoxy resin does not normally cure by itself. A compatible Resin and Hardener must be combined in the correct proportion to start the curing process.
Understanding how resin and hardener work together is essential for achieving a smooth, durable, and attractive finished product. Incorrect measurements, poor mixing, unsuitable pigments, or improper curing conditions can affect the final result.
This guide explains the basics of resin and hardener, how to mix them properly, common applications, mistakes to avoid, and useful tips for resin artists and DIY creators.
What Are Resin and Hardener?
Epoxy resin systems generally consist of two components:
-
Epoxy Resin
-
Epoxy Resin Hardener
The resin is the main component, while the hardener is the curing component that reacts with the resin.
When the two components are combined according to the manufacturer's specified ratio, a chemical reaction begins. Over time, the mixture changes from a liquid into a solid material.
The exact mixing ratio, curing time, working time, and performance depend on the specific epoxy resin system.
Why Is the Correct Resin-to-Hardener Ratio Important?
One of the most important steps when working with epoxy resin is following the manufacturer's recommended mixing ratio.
Different resin systems may require different ratios. Therefore, a ratio should never be guessed or assumed based on another product.
Incorrect proportions can lead to problems such as:
-
Soft or sticky surfaces
-
Incomplete curing
-
Reduced durability
-
Uneven finish
-
Longer curing time
-
Poor overall performance
Always check the instructions provided with the specific resin and hardener before mixing.
How Resin and Hardener Cure
When resin and hardener are mixed correctly, they undergo a chemical reaction that gradually converts the liquid mixture into a solid material.
The curing process generally progresses through stages:
Liquid Stage
The mixture remains workable and can be poured into molds.
Thickening Stage
The mixture gradually becomes more viscous.
Gel Stage
The resin begins to lose its fluidity and starts becoming firm.
Curing Stage
The material continues hardening until it reaches the properties specified by the product manufacturer.
Curing time can vary according to the resin formulation, temperature, humidity, thickness, and other conditions.
How to Mix Resin and Hardener Correctly
Proper mixing is one of the most important parts of resin crafting.
Step 1: Prepare Your Workspace
Work on a clean, level surface.
Keep the following materials ready:
-
Epoxy Resin
-
Epoxy Resin Hardener
-
Mixing Cups
-
Stirring Sticks
-
Silicone Molds
-
Pigments
-
Measuring Tools
-
Suitable Protective Equipment
Step 2: Read the Product Instructions
Before measuring anything, check the manufacturer's recommended resin-to-hardener ratio.
Step 3: Measure Carefully
Measure both components accurately according to the specified ratio.
Avoid estimating quantities by eye.
Step 4: Combine the Components
Pour the resin and hardener into a clean mixing container.
Step 5: Mix Thoroughly
Stir slowly and consistently.
Scrape the bottom and sides of the container so that both components are properly incorporated.
Step 6: Add Pigments if Appropriate
Once the resin and hardener are properly mixed, add a compatible pigment gradually.
Step 7: Pour Into the Mold
Pour the prepared mixture into your selected mold.
Step 8: Allow It to Cure
Leave the project undisturbed and allow it to cure according to the manufacturer's instructions.
Why Slow Mixing Is Important
Mixing too aggressively can introduce unnecessary air into the resin.
Air bubbles may become trapped in the finished product.
A slower and controlled mixing technique can help reduce unnecessary air incorporation.
However, the resin manufacturer's mixing instructions should always take priority.
Resin and Hardener for Resin Art
Epoxy resin systems are widely used in decorative resin projects.
Popular applications include:
-
Resin Coasters
-
Trays
-
Jewelry
-
Keychains
-
Clocks
-
Wall Art
-
Decorative Panels
-
Ornaments
-
Personalized Gifts
Because epoxy resin can provide a glossy finish after curing, it is suitable for many decorative designs.
Resin and Hardener for Coaster Making
Resin coasters are one of the most accessible projects for beginners.
A basic coaster design can include:
-
Epoxy resin
-
Hardener
-
Mica Powder
-
Glitter
-
Silicone coaster mold
Popular styles include:
-
Marble
-
Ocean
-
Geode
-
Metallic
-
Abstract
-
Minimalist
Using different pigments allows creators to develop multiple color collections from the same mold.
Resin and Hardener for Jewelry
Epoxy resin can be used to create small decorative accessories when the resin system is suitable for the intended application.
Examples include:
-
Pendants
-
Earrings
-
Charms
-
Rings
-
Decorative pieces
Small molds allow artists to experiment with different color combinations and inclusions.
Resin and Hardener for Keychains
Personalized resin keychains are another popular craft application.
Creators can use:
-
Alphabet molds
-
Number molds
-
Shape molds
-
Custom designs
The resin can be combined with suitable Mica Powder, glitter, metallic pigment, or other compatible decorative materials.
Choosing Pigments for Resin
Once the resin and hardener have been mixed correctly, compatible pigments can be added according to the product recommendations.
Different pigments can create different effects.
Mica Powder
Provides rich colors and shimmer.
Metal Pigment
Creates metallic-looking effects.
Glow in the Dark Powder
Provides a luminous effect under suitable conditions.
Chameleon Flakes
Creates color-shifting visual effects.
Glitter for Resin
Adds sparkle and decorative highlights.
Using a combination of materials can create more complex designs, but too many decorative elements can make a project look crowded.
Resin and Hardener with Mica Powder
Mica Powder is commonly used to color compatible epoxy resin.
Artists can create:
-
Solid colors
-
Gradients
-
Marble effects
-
Ocean patterns
-
Geode artwork
-
Abstract designs
Add the pigment gradually after properly mixing the resin and hardener.
Resin and Hardener with Metal Pigment
Metal Pigment can be used to create gold, silver, copper, bronze, and other metallic-looking effects.
Popular combinations include:
Black + Gold
White + Silver
Navy + Copper
Green + Bronze
Metallic pigment can be used as a primary color or as an accent.
Resin and Hardener with Glow in the Dark Powder
Suitable Glow in the Dark Powder can be incorporated into compatible resin systems to create luminous artwork.
Possible applications include:
-
Galaxy art
-
Glowing keychains
-
Night-themed coasters
-
Ornaments
-
Decorative artwork
The glow intensity depends on the specific pigment and the conditions under which it is used.
Resin and Hardener with Chameleon Flakes
Chameleon Flakes can add a color-shifting effect to suitable resin projects.
A dark resin background can provide strong contrast for the changing reflective colors.
This combination can be used for:
-
Jewelry
-
Keychains
-
Coasters
-
Trays
-
Decorative artwork
Resin and Hardener with Glitter
Suitable Glitter for Resin can add additional sparkle to finished products.
For example:
-
Gold resin + gold glitter
-
Blue resin + silver glitter
-
Purple resin + holographic glitter
-
White resin + iridescent glitter
Use glitter in controlled amounts so that it does not overpower the main design.
How to Reduce Bubbles in Epoxy Resin
Bubbles are a common concern when working with resin.
Some practices that can help include:
-
Mix slowly
-
Avoid aggressive stirring
-
Scrape the container carefully
-
Pour gradually
-
Use suitable resin techniques recommended by the manufacturer
-
Work in an appropriate environment
If bubbles remain, follow the resin manufacturer's recommended bubble-removal method.
Avoid using methods that could damage the resin, mold, workspace, or surrounding materials.
Common Resin and Hardener Mistakes
Incorrect Mixing Ratio
Using the wrong ratio can prevent proper curing.
Solution: Follow the manufacturer's specified ratio.
Incomplete Mixing
Unmixed resin or hardener can remain in the container.
Solution: Scrape the bottom and sides while mixing.
Adding Too Much Pigment
Excessive pigment can affect some resin systems.
Solution: Add pigment gradually and follow product recommendations.
Working in Unsuitable Conditions
Temperature and humidity can influence curing.
Solution: Follow the recommended environmental conditions for the resin.
Pouring Too Thickly
Some resin systems have limitations on maximum pour depth.
Solution: Follow the manufacturer's instructions for layer thickness.
How Long Does Epoxy Resin Take to Cure?
There is no single curing time for every epoxy resin.
Curing can depend on:
-
Product formulation
-
Temperature
-
Humidity
-
Layer thickness
-
Mixing ratio
-
Project size
Some products may become touch-dry relatively quickly while requiring substantially longer to reach their final properties.
Always use the curing schedule supplied by the manufacturer.
How to Choose Epoxy Resin and Hardener
If you plan to Buy Epoxy Resin and Hardener, consider the following factors:
Intended Application
Choose a resin system suitable for your project.
Mixing Ratio
Check whether the system requires a specific ratio by weight or volume.
Working Time
A longer working time may be useful for detailed projects.
Curing Time
Consider how quickly you need the project to become usable.
Finish
Some systems are designed to provide a clear glossy appearance.
Pouring Requirements
Check the manufacturer's recommended maximum thickness for each pour.
Product Information
Always read the technical and safety information before use.
Storing Resin and Hardener
Proper storage can help maintain product quality.
Store resin and hardener:
-
In their original containers where possible
-
With lids securely closed
-
In a suitable cool and dry location
-
Away from direct sunlight
-
Away from incompatible materials
-
According to the manufacturer's storage instructions
Keep containers clearly labeled.
Safety Tips When Working with Resin
Always read the manufacturer's safety instructions before using an epoxy resin system.
General good practices include:
-
Work in a well-ventilated area.
-
Avoid unnecessary skin contact.
-
Use suitable protective equipment.
-
Keep materials away from food and drinks.
-
Keep resin and hardener away from children and pets.
-
Follow the product's recommended handling instructions.
-
Clean spills according to the manufacturer's guidance.
Safety requirements can vary between products, so the manufacturer's instructions should always take priority.
Resin and Hardener for Handmade Businesses
Resin systems can be useful for businesses producing handmade decorative products.
A single resin system can be used to develop multiple collections, including:
-
Coasters
-
Keychains
-
Jewelry
-
Trays
-
Clocks
-
Decorative artwork
-
Personalized gifts
Different molds and compatible pigments can create completely different product styles.
For example:
Epoxy Resin + Mica Powder
can create colorful resin artwork.
Epoxy Resin + Metal Pigment
can create metallic designs.
Epoxy Resin + Glow Powder
can create luminous products.
Epoxy Resin + Chameleon Flakes
can create color-shifting effects.
Why Quality Resin and Hardener Matter
The quality and compatibility of the resin system can have a significant effect on the final project.
A suitable resin and hardener system can help provide:
-
Consistent curing
-
Clearer appearance
-
Better surface finish
-
Predictable working time
-
Repeatable results
For handmade businesses, consistency is particularly important because customers expect products from the same collection to have a similar appearance.
Jinoyal Industries Pvt. Ltd. offers creative materials including Epoxy Resin, Epoxy Resin Hardener, Mica Powder, Metal Pigment, Glow in the Dark Powder, Chameleon Flakes, and Glitter for Resin for resin artists, DIY creators, craft enthusiasts, and handmade businesses.
Frequently Asked Questions
1. What is the difference between resin and hardener?
Epoxy resin and hardener are two components of an epoxy system. They react together according to the manufacturer's specified ratio to create the cured material.
2. Can resin and hardener be mixed in any ratio?
No. Always follow the specific mixing ratio provided by the resin manufacturer.
3. Can Mica Powder be added to epoxy resin?
Yes. Mica powder intended for resin applications can be added to a compatible epoxy resin system.
4. Can Metal Pigment be mixed with resin?
Yes. Suitable metal pigment can be used to create metallic-looking effects in compatible resin systems.
5. Why is my resin still sticky?
Sticky resin can result from several factors, including incorrect mixing ratio, incomplete mixing, unsuitable curing conditions, or insufficient curing time. Check the manufacturer's instructions for the specific product.
6. Can Glitter be added to epoxy resin?
Yes. Suitable glitter designed for resin applications can be incorporated into compatible epoxy resin.
7. How should resin and hardener be stored?
Keep both components properly sealed and stored according to the manufacturer's recommended conditions.
Final Thought
Resin and Hardener work together to create the foundation for many popular epoxy resin projects. From coasters and trays to jewelry, keychains, clocks, and decorative artwork, a properly prepared epoxy system gives creators a versatile medium for experimenting with colors and designs.
The most important steps are to follow the manufacturer's mixing ratio, measure accurately, mix thoroughly, use compatible pigments, and provide the appropriate curing conditions.
For additional creative effects, compatible Mica Powder, Metal Pigment, Glow in the Dark Powder, Chameleon Flakes, and Glitter for Resin can be used to create colorful, metallic, luminous, color-shifting, and sparkling designs.
Whether you are a beginner exploring resin art or a handmade business developing a product collection, understanding how Resin and Hardener work together can help you achieve more consistent and attractive results.
Get in Touch
website : https://www.jinoyal.com/
E mail id : Support@jinoyal.com
Contact No : 9289666435
Insta id : https://www.instagram.com/jinoyal/
- Business
- Technology
- Finance
- Health
- Fashion
- Lifestyle
- Travel
- Food
- Education
- Real Estate
- Automobile
- Entertainment
- Sports
- Pets
- Home Decor
- Gardening
- Parenting
- Wedding
- Beauty
- Gaming
- Photography
- Music
- Movies
- News
- Politics
- Religion
- Astrology
- Law
- Insurance
- Jobs
- Freelancing
- Remote Work
- Blogging
- E-commerce
- WordPress
- OpenCart
- Social Media
- Graphic Design
- Web Design
- Programming
- Mobile Apps
- Artificial Intelligence
- SaaS
- Cyber Security
- Cloud Computing
- Hosting
- SEO
- Content Writing
- Email Marketing
- Affiliate Marketing
- YouTube
- Podcasting
- Interior Design
- DIY
- Crafts
- Art
- Architecture
- Environment
- Agriculture
- Animals
- Fishing
- Hunting
- Survival
- Outdoor
- Fitness
- Yoga
- Meditation
- Mental Health
- Skin Care
- Hair Care
- Makeup
- Jewelry
- Sarees
- Salwar Kameez
- Lehenga Choli
- Kurtis
- Men Fashion
- Women Fashion
- Kids Fashion
- Footwear
- Bags
- Watches
- Luxury
- Shopping
- Coupons
- Electronics
- Smartphones
- Laptops
- Tablets
- Cameras
- Home Appliances
- Kitchen
- Furniture
- Cleaning
- Baby Care
- Senior Care
- Relationships
- Self Improvement
- Motivation
- Quotes
- Festivals
- Events
- Careers
- Remote Work
- Productivity
- Wholesale
- Manufacturing
- Import Export
- Logistics
- Supply Chain
- Human Resources
- Customer Service
